
Key takeaways
What matters before you keep reading
01
A useful tech pack is built from garment-specific decisions, not from a blank checklist alone.
02
The highest-risk sections are usually measurements, BOM, construction notes, artwork placement, and export context.
03
AI-generated tech packs are strongest when they create a filled technical package that only needs final brand and factory-specific confirmation.
Reader guide
Reader guide
A quick frame before the workflow details.
For
Founders, designers, product developers, and apparel teams making a first sample or preparing manufacturer outreach.
Read when
Best read after you have garment references or sketches and before you contact a factory.
You'll get
A step-by-step creation workflow, a quality checklist, and examples from a complete generated tech pack.
On this page
Follow the article through the long read and keep your place.
On this page
9 sections
Making a tech pack is not just formatting a document. It is the process of turning a garment idea into a production-readable package a manufacturer can understand.
A useful creation guide explains the workflow and the finished sections: not just that you filled a template, but that the factory can inspect the garment, quote it, sample it, and ask precise questions.
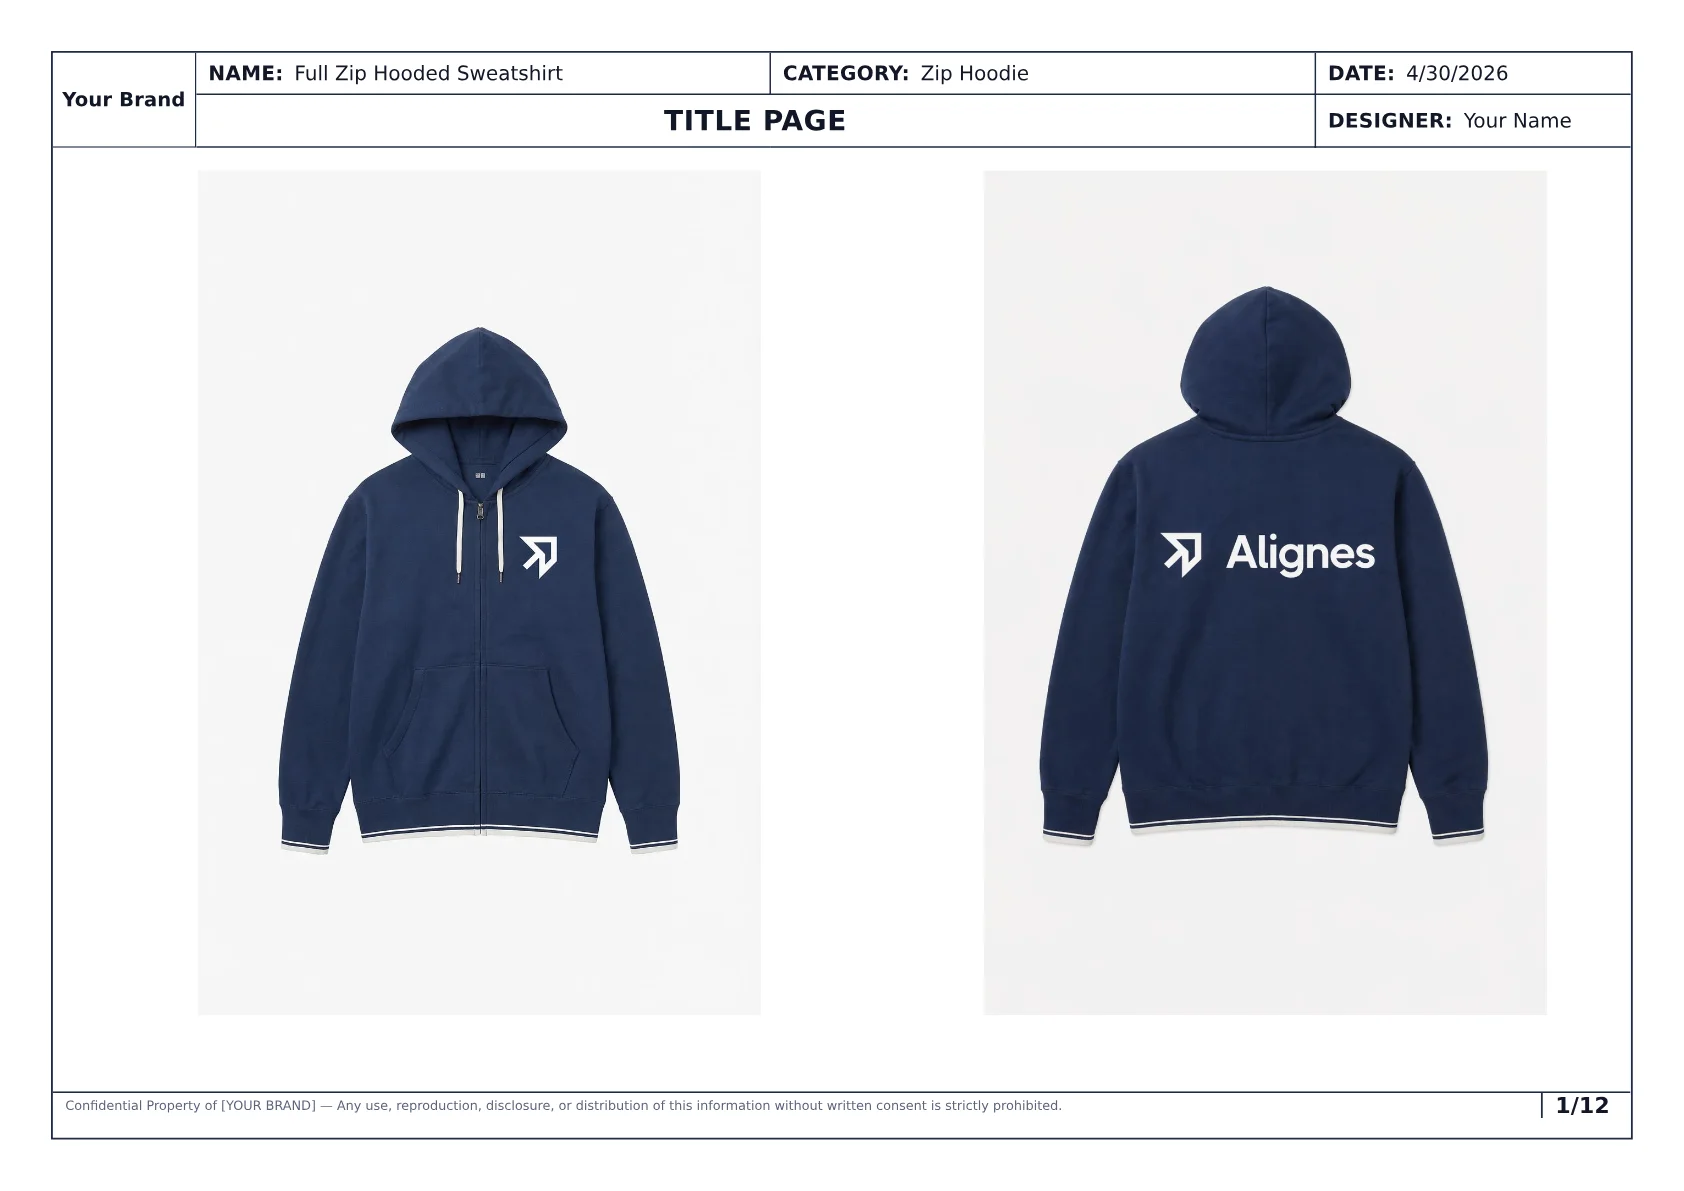
The first page establishes style context, sample size, colorway, and date before the factory reads measurements or materials.
Step 1: Define the garment before the document
Start by writing down what the garment is. This sounds obvious, but many weak tech packs begin with scattered references and no clear product definition.
Capture the basic context. In an AI-assisted workflow, that context can be a photo on a person, a product photo, a sketch, front-only references, front and back references, one broad prompt, or separate details for Material, Colorway, Construction, and Fit.
Capture the basics:
- style name,
- garment category,
- target customer or fit intent,
- sample size,
- planned size range,
- sample stage,
- key reference images,
- notes that should influence construction or materials.
If the garment is still vague, the tech pack will be vague too. The document can organize the work, but it cannot replace the underlying product decision.
Step 2: Add front and back visuals
Manufacturers need front and back views that describe the garment without campaign styling, model poses, or mood-board ambiguity.
For a manual workflow, this usually means creating technical drawings or production-facing garment views. For an AI-generated workflow, the system should convert garment references into overview views and callouts that the team can confirm before handoff.
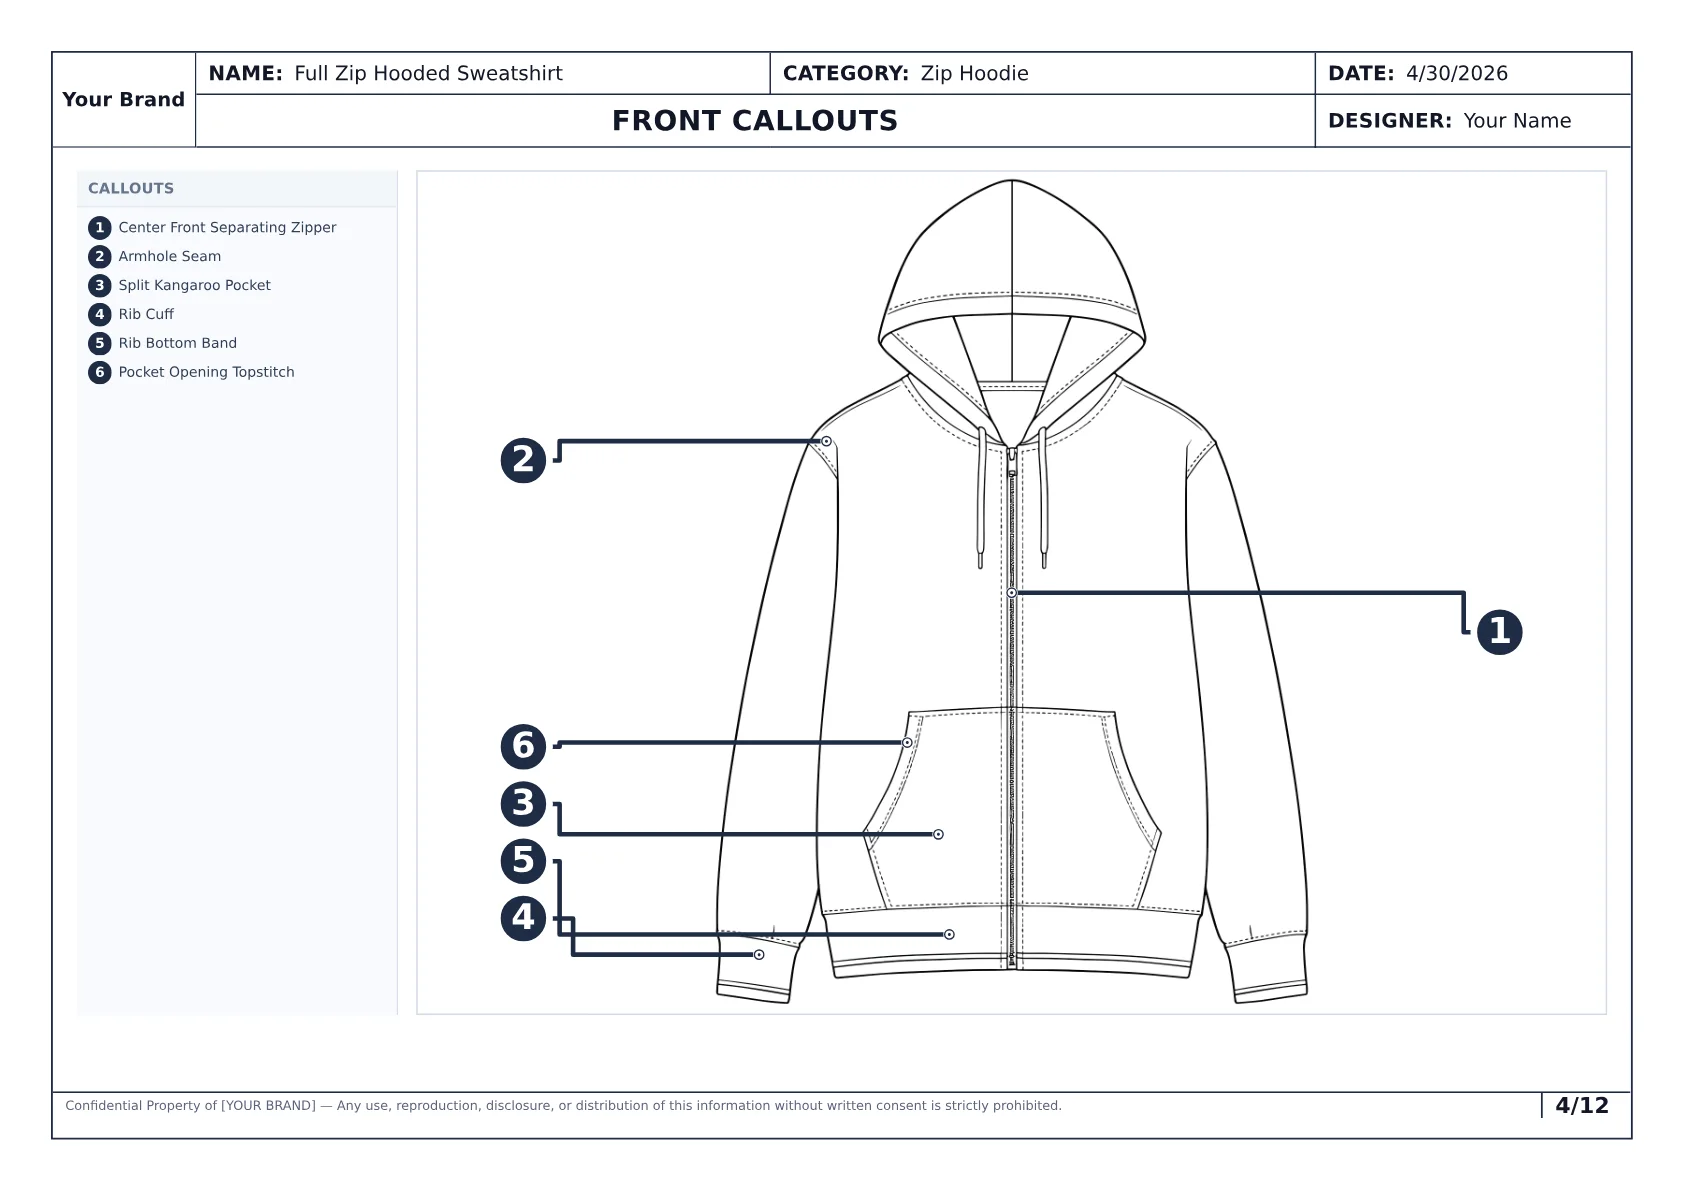
Strong callouts turn garment references into reviewable production notes by tying details to exact areas of the style.
Step 3: Write callouts like a factory will read them
Callouts are where the garment stops being just a picture. They explain details the factory needs to build or inspect.
Useful callouts can cover:
- seam placement,
- pocket shape and position,
- cuff, hem, collar, waistband, or hood construction,
- zipper, button, drawcord, snap, or hardware behavior,
- print, embroidery, patch, label, or artwork placement,
- contrast fabric or trim locations,
- details that differ between front and back.
Avoid vague callouts like "nice finish" or "premium stitching." A manufacturer needs the detail, not the mood.
Step 4: Build the measurement section
Define the base sample size and the points of measure. If grading is not ready yet, say that explicitly.
Include:
- measurement name,
- point of measure,
- value,
- unit,
- sample size,
- graded measurements or size-range notes,
- notes for anything that needs fit review.
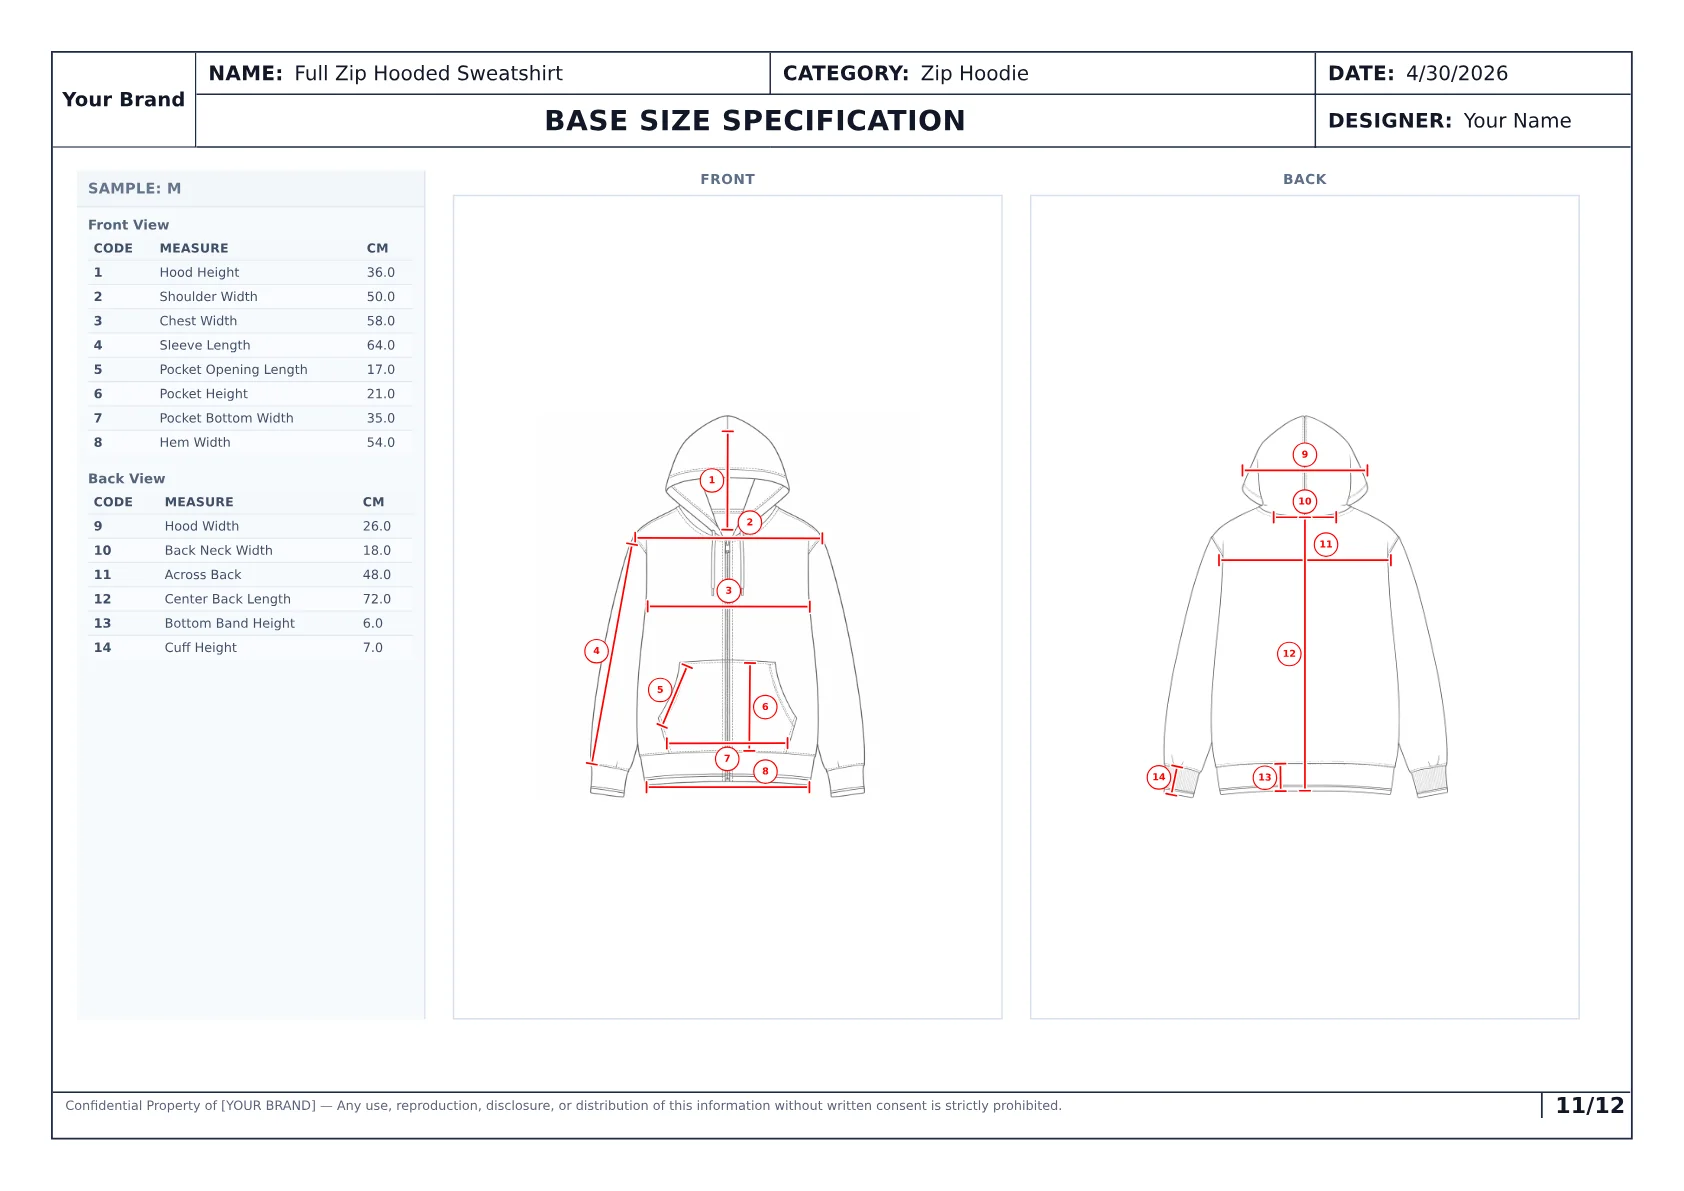
Measurements and POMs make the pack measurable. Without them, fit review becomes subjective and factory communication slows down.
Step 5: Create the BOM
The bill of materials lists what the garment is made from. A weak BOM says "cotton fleece" and "zipper." A useful BOM separates components and shows what is known, assumed, or pending.
Your BOM should cover:
- shell fabric,
- lining or secondary fabric,
- rib or reinforcement materials,
- trims and hardware,
- labels and care information,
- artwork applications,
- thread and stitch notes,
- supplier/source notes if already selected.
If a material choice is not final, label it as pending. That is better than making the factory guess.
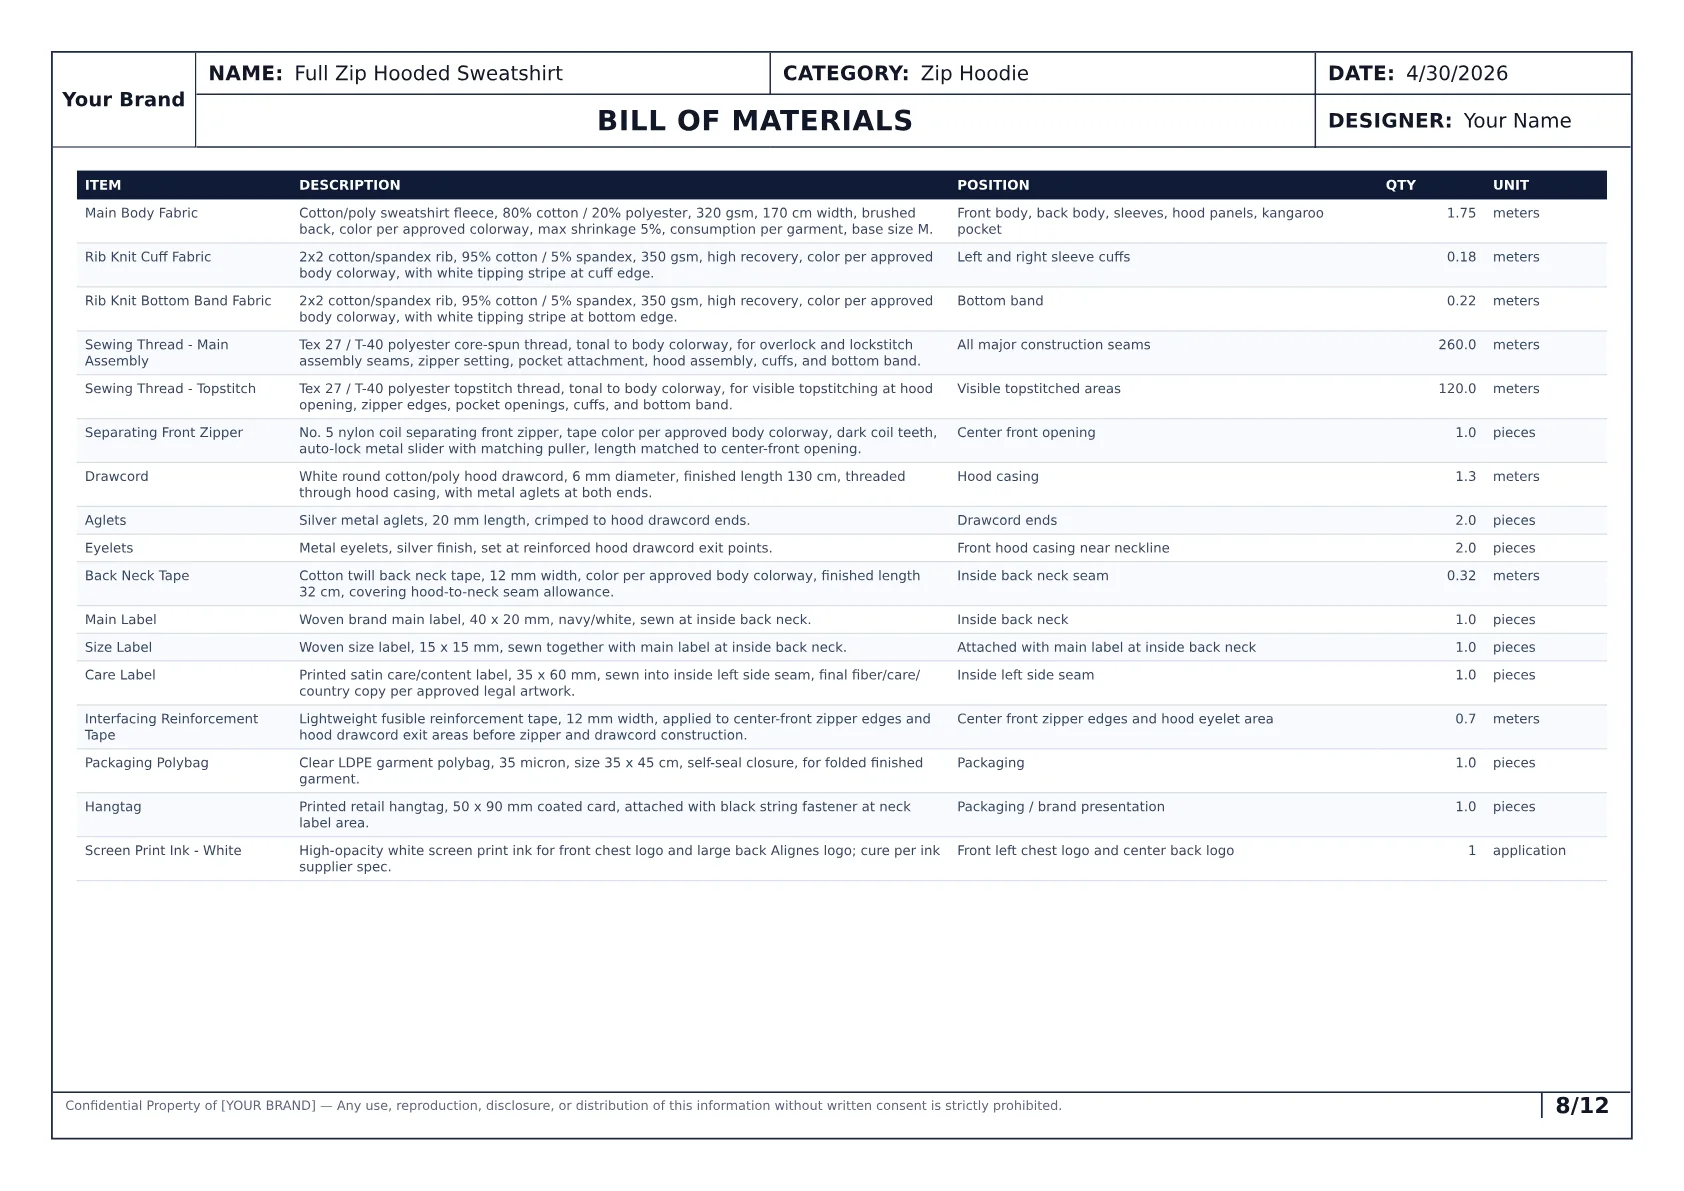
A populated BOM is one of the fastest ways to tell whether a tech pack is production-readable or just visually polished.
Step 6: Document construction details
Construction details describe how the garment should be built. This section is easy to underwrite because the designer may feel the visual reference is obvious.
The factory still needs explicit notes for:
- seams,
- stitch types,
- reinforcement,
- panel relationships,
- pockets,
- closures,
- hems and cuffs,
- collar or hood behavior,
- finishing expectations,
- anything that should not be left to interpretation.
This is where strong AI-generated tech packs matter. The goal is not a weak draft that forces the team to rebuild the document. The goal is a filled construction section that is close enough to production language that the team is confirming, refining, and adding factory-specific judgment.
Step 7: Add colorways, artwork, labels, and packaging
For styles with multiple colorways, keep each colorway connected to the same garment structure. Make artwork and label placement visible enough for the factory to understand size, method, and position.
Include packaging only when it matters for the current stage. Early sampling may need a simple note. Production handoff needs more detail.
Step 8: Review the pack before factory handoff
Before sending the tech pack, check whether a manufacturer can understand the style without opening other files.
Checklist
Review this before sending the tech pack
The final review should catch missing production detail, not just typos.
The garment is defined
The factory can see the style name, category, sample size, size range, and dated export.
Visuals and callouts agree
Front, back, and detail notes describe the same garment.
Measurements are usable
POMs, values, units, and graded measurements are clear enough for sample review.
BOM is populated
Materials, trims, labels, hardware, artwork, and pending assumptions are visible.
The current export is identifiable
The PDF or share link has clear garment context, date, and page structure.
Manual template vs AI-generated tech pack
A template can help you remember the sections. It does not create garment-specific technical content, and it should not be treated as the main workflow when you need a real production document.
An AI-generated tech pack is more useful when it starts from your garment references and produces the filled technical package: visuals, specs, measurements, BOM, construction details, callouts, colorways, artwork, and export pages.
The final pass still matters. But the work begins much closer to a real production document than a blank table.
Generate, confirm, export
A stronger workflow for making tech packs
What changes across the process
- 01
Step 01
Upload references
Start with garment images, sketches, notes, color direction, and construction context.
- 02
Step 02
Generate the structured pack
Let the system create specs, measurements, BOM, construction details, callouts, colorways, artwork, and pack structure.
- 03
Step 03
Confirm and hand off
Confirm assumptions, refine details, and export the current PDF for manufacturer review.
The workflow should generate the filled package first, then keep final control before factory handoff.
Process showing garment references becoming a generated tech pack draft and reviewed export
In practice
Compare the workflow with a real generated tech pack
The hoodie example shows a complete 12-page generated tech pack with overview, callouts, measurements, BOM, construction, colorways, artwork, and export-ready structure.
View the hoodie tech pack exampleFAQ
Common questions, answered clearly.
Yes, but the result needs enough garment-specific detail for a factory to quote and sample without guessing. A blank template is not enough unless you fill it with clear measurements, materials, construction, artwork, and document context.
Next step
Generate the filled tech pack first
Styneo turns garment images, sketches, notes, and references into structured tech packs with specs, measurements, BOM, construction details, callouts, colorways, and export-ready pack structure.